
For this cake you will need 16 flowers using 4 different colors. Make 11 regular sized flowers and 5 slightly smaller ones.
To learn how to make basic gelatin art desserts, see our beginner instructions page here:
Before you begin making the cake, draw a cake pattern on a piece of paper and plan you colors in advance. Move the colors around and see how they work together before you make the final decision.

Use light colors as they do not stain the gelatin around them and they stay crisp and clear even if it takes you several days to finish the cake.
When you are ready to start arranging the flowers, prepare two batches of clear gelatin (double the recipe) and let it cool until it is slightly warmer than room temperature.
It is very important to keep gelatin at the proper temperature. If the gelatin is too hot it will melt your flowers and if it is too cool it will start thickening up and you won't be able to work with it.
The easiest way to control the gelatin temperature is to keep the container with gelatin in warm water. If it cools down too much, add more warm water in the dish below and it will become liquid and warm again.
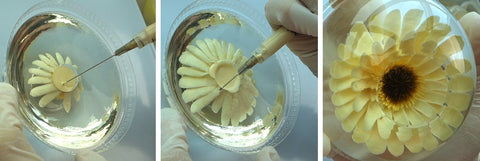
Pour a little bit of liquid gelatin into a large bowl and place one flower dessert in the center.

Place the whole bowl onto a plate or a dish that will allow you to rotate the bowl until the flower rests in the center of the bowl.
Allow the gelatin to set completely by either keeping it in the fridge or by placing ice water in the plate below.
When the first flower is firmly set, place a light plastic bowl on top of it and secure it tightly with tape. Use a bowl that is big enough to leave just enough space for flowers to be inserted along the bowl edge.

Add more of the liquid gelatin base into the bowl and place five gelatin flowers around the center, one at a time.

Trim the desserts to remove the excess gelatin around the flower.
Rub a bit of gelatin onto the bowl edges to make them slippery and allow the flower desserts to slip into place easily.
After the first row, place the bowl in the fridge and allow gelatin to set before moving onto the next row.

Make sure to check for air bubbles and let them out while the gelatin is still liquid.
Add more liquid gelatin if needed, but do not cover more than one half to two thirds of the flower or you will have trouble adding the last row.
Let the gelatin set again in the fridge.
If you need more space for the last row, take out some of the set gelatin between flowers with a spoon.
Warm up some clear gelatin and place the last five flowers following the instructions from the first row.

When the last row is in place, add more liquid gelatin if needed but do not fill the bowl all the way up. If you add too much liquid, the last row of flowers will be lifted by the liquid and will stick out of the cake too much. Allow the last row of flowers to set completely and then add the rest of the gelatin to complete the cake.
Leave the gelatin in the fridge to set again.
When the gelatin has set completely, remove the tape from the container and then remove the inner bowl using warm water.
Pour warm water into the inner bowl to melt the gelatin around it and release the bowl. When the inner bowl can spin freely in place, remove the water from it with a ladle and then wiggle the bowl out of the hole. Allow air to enter between the bowl and gelatin to break the vacuum that is keeping the bowl from detaching.
If you have too much melted gelatin remaining in the opening after the bowl has been removed, scoop it up gently with a wet tissue.

Cut the excess gelatin from the top to make it straight.
Turn your cake upside down and check for large empty areas. Add leaves, baby's breath or other details as desired.

At this point, you are ready to start filling the center of the cake. You can use one of the mousses from our recipe page, a fruit jelly or a milk color base, but make sure that the middle is strong enough to hold the outer layer of gelatin. Increase the amount of gelatin you use in the filling recipe if necessary.

Make one layer at the time and let each layer set completely before moving onto the next one.
Recipes for the color base and the mousse fillings can be found on our Recipes page.
Taking the cake out of the container
Fill a large container or a kitchen sink with warm water deep enough to cover the entire outer surface of the bowl.
Run a toothpick or a small knife alongside the gelatin edge to release it from the bowl.
Place the bowl in warm water and wait until the gelatin has melted around the edge. Tilt the bowl gently to see if the cake is moving inside it but do not force it to move as that will cause the gelatin to tear.
Once the cake can spin freely in place, cover the bowl with a serving platter and turn the bowl upside down.
*** Be very careful when working with glass bowls! The cake will be quite heavy and gelatin is very slippery when wet. Make sure you use non-slip kitchen gloves or kitchen cloths that will allow you to get a good grip. Keep the cake bowl close to a flat surface in case it slips out of your hands.
If any liquid gelatin leaks or drips where is shouldn't, clean it up with lots of warm water to avoid having a sticky mess afterward.
Congratulations! If you have followed all the instructions correctly, you now have a wonderful gelatin art flower cake!!!
Take your camera out and get ready to become a Facebook star!

Below is a video that shows a similar cake being made:
Learn how to make Gelatin Art Desserts
Delicious flowers drawn in clear jelly.

