You can make a large gelatin cake by putting several small gelatin desserts together and covering them with liquid gelatin.
This will enable you to make beautiful designs and place flowers in places that would be impossible to reach with a syringe.
Follow these simple steps to avoid making some of the most common mistakes.
1. Start with making several small desserts.

Make a few more in case some get damaged in the process.
2. Make a fresh gelatin base and pour a little bit of warm gelatin into a large container or mold.
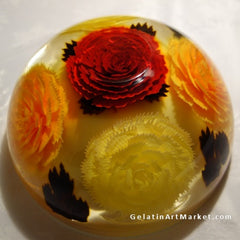
The temperature should be warm enough to melt the edges of the set gelatin but not hot enough to melt the dessert completely. If the gelatin is too cold, the layers will not blend together and the border between them might remain visible in the finished dessert. The layers will also separate when you cut the dessert and the color base might leak in between layers if you try to draw additional elements when the gelatin has set.
Here is an example of the color leaking between gelatin layers.
3. Take the desserts designated to be on the top of the desert out of their containers and place them in the bowl with warm gelatin. Remove all air bubbles including the ones trapped on the bottom.
Put the bowl in the fridge or in cold water until the gelatin sets.
4. When the gelatin is hard and the bottom pieces are set in place, place a small bowl in the middle of the big one. You can add some weight to it to help keep it in place, but make sure it is not too heavy and deforming the pieces on the bottom.
Once the bowl is in place, secure it with wide (sello)tape to prevent it from shifting. Make sure you leave space around it to place the rest of the gelatin pieces into the bow.
5. Pour some more warm gelatin into the bowl, just enough to cover the set gelatin by half an inch or so. If the gelatin has cooled down, warm it up on the stove or place the pot in warm water for a few minutes.
Take the rest of the desserts out of their plastic containers and place them one by one into the large bowl. Make sure you pour a bit of warm gelatin on top of the dessert before placing it into the large bowl to help slide it in more easily. Dry gelatin will stick to the bowl and might tear.

When all pieces are in the bowl, add enough warm gelatin to cover approximately two thirds of the added pieces. You can cover the new pieces completely at his point but it is better to work in layers to prevent the pieces from getting displaced.
6. Check the sides of the bowl and remove all air bubbles.
Put the gelatin bowl back into the fridge or cold water and wait until it thickens up a bit. Add the rest of the warm gelatin into the bowl and let it set completely.
7. Once the gelatin has set, you will need to remove the small bowl placed in the middle.
Remove the tape from the top carefully and the weight, if you used any. Pour warm water into the small bowl to help melt the gelatin around it. Wait a few minutes for the gelatin to melt. You might have to place more warm water into the bowl if it cools down before the bowl is released completely.

When the gelatin has melted around the small bowl and it is possible to spin it in place, remove as much water from it as you can with a ladle and then shift it slowly out of the hole.
8. At his point you can add additional elements to the dessert if you wish, small flowers, leaves, babys breath.
9. Cut off any bumps remaining from the original shape.
10. Fill the hole with colored gelatin, fruit juice jello, milk color base or mousse layers and let it set in the fridge for a few hours.

You can find the recipes for these options in out recipe section.
11. Serve and enjoy :)

More information on how to work with gelatin including how to safely take gelatin desserts out of containers can be found in our "Instructions" section.