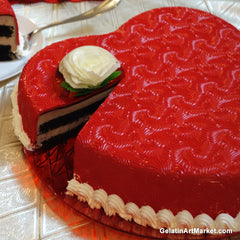
If you are not a fan of fondant but still want a professional-looking and flavorful finish on your cake, try using gelatin on your fondant impression mats.
This technique is also very useful when you are placing gelatin art desserts on top of your cake.
Gelatin desserts hold a lot of liquid. If they are placed onto buttercream or cake pastry, the sugar in those ingredients can react with moisture in gelatin and the cake can become wet and soggy. Placing a gelatin color base layer between the cake and the gelatin dessert creates a barrier and prevents the water from soaking the cake.
Instructions:
To make the cake cover, place the silicon fondant impression mat into a wide baking pan or serving tray. The mat doesn't have to fit completely into the tray, just make sure you have enough flat surface to cover your cake.

Check to see whether your tray is straight. Place the tray onto a flat surface and press the middle of the tray down. If it you can feel it lowering under pressure, your cake cover thickness will not be even. You can still use the pan, but use more material to ensure you have at least 3 to 5 mm of coverage everywhere.
Make a gelatin base using approximately 1 Tbsp of gelatin and 1/2 cup of sugar per 1 cup of liquid.
The most basic cream recipe is as follows:
1 Cup of milk
2 Cups Heavy cream (35%)
1.5 cups of sugar
1/4 Tsp. vanilla extract
1 Tbsp. White food coloring
A few drops of other food coloring. (optional)
When the gelatin has dissolved, add the white food coloring and mix it in with a stick blender or and electrical mixer.
Add the heavy cream and stir.
To make a chocolate color base, use 3 cups of water and 3 Tbsp of cocoa instead of the milk and cream.
You can see two cakes covered with extra dark and regular cocoa below:


You can find other color base recipes on our recipe page here.
Increase the amount of ingredients depending on the size of your mat and trays.
Pour the prepared color base onto the impression mat.

If you have enough leveled surface in your fridge, leave the tray with the color base in the fridge for several hours.
If you are not sure whether the tray will be perfectly horizontal on your fridge shelves, let the color base to thicken up at room temperature. Move it to the fridge when it is thick and no longer moving in the tray.
For best results, allow the color base to set overnight. If you are in a hurry, you might be able to use it in a few hours but be careful as it will be very soft and it will tear easily.
When the color base has completely set, do not take it off the mat. Place the mat with the color base onto the cake and then carefully separate the two.
![]()
You should have a perfect and shiny mat impression on the cake cover.
Trim the edges of the cover as needed.

If your cake is low, you might be able to cover the sides of the cake as well. The color base is elastic, you can stretch it gently to cover the curves of your cake.

You can cut thin strips and attach them to the side of the cake as well.

If you are covering a tall cake, you might want to cover the sides with buttercream or simple whipping cream instead.

You can also use this layer of color base to cover the back of your gelatin art desserts. The impression pattern will be visible through clear gelatin and will give your dessert a different look depending on the angle from which you are looking at it.


If you do not wish the impression to be visible on your dessert, when you place it on the cake, seal the dessert with a non-transparent color base before taking it out of the container.

Here is an example of a cake cover made from Coconut milk, sugar and gelatin.

To prevent your cake cover from drying, cover the cake with a layer of mousse before placing the cover. Mousse will provide constant moisture and keep the cover fresh for days.
To learn more about gelatin art, visit our instructions page here.
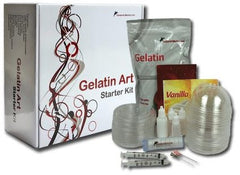
To purchase gelatin art supplies, visit our online store.
