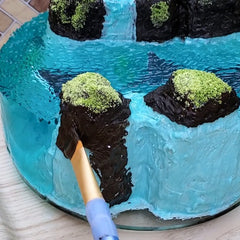
This article shows how to make a delicious, fruit-flavored jelly ocean island cake with waterfalls and cream-filled stingrays.
If you would like to learn the basics of working with gelatin, visit our free online class here.
Rich, dark chocolate mountains pair nicely with the refreshingly tangy, sweet jelly ocean. Remember to use high quality gelatin for jelly desserts. Inexpensive gelatin will have a dark, yellow tint and a strong, unpleasant odor.
Start by carving your cake into a desired shape and cover it with a thin layer of buttercream.

Place dark chocolate chunks in a microwave-safe bowl. Sprinkle a little bit of cooking oil on top and heat for 20-30 seconds in a microwave. Stir until the mixture is smooth and even.


Use a small spatula or brush to cover the top of the cake with chocolate.

When the cake top is covered with chocolate, prepare the green cookie crumble.
There are several ways to prepare the crumble. You can crush a store-bought cookie and color it with green food coloring.
As a healthier alternative, prepare a batch of cookie dough and mix in fresh spinach leaves. Most cookie recipes will work for this purpose. Make at least two shades of green.
Here is an example of two quick microwave cookies:
Blend a handful of spinach in a food processor. Add 4 Tbsp. butter, 4 Tbsp. sugar, 2 Tbsp. coconut flour, 1 Tsp. baking powder, 1 Tsp. Lemon zest. 50 ml egg whites.
Mix only one half of the egg whites at first. Bake half of the batter for 1 minute in the microwave. Mix the rest of the egg whites into the batter and bake the second cookie. This should give you one darker and one lighter green cookie.


Coconut flour should result in a very dry dough. Place the cookies into a toaster or oven to dry them completely.
You might want to prepare the cookies in advance and leave them in the fridge to dry overnight.
When the cookies are dry, turn them into a fine crumble using a food processor. Keep the two shades separate.


Melt more dark chocolate with oil and add black cocoa powder to the mixture.
Spread the fresh chocolate mixture onto cake peaks and sprinkle them with cookie crumbs. Alternate between the two shades of green to create a realistic pattern. Press the crumbs into the chocolate cream and make sure there are no loose crumbs left on the cake.


Melt white chocolate and oil in the microwave for 20-30 seconds. Mix until smooth and add blue food coloring.


Spread the white chocolate cream over the lower portion of the cake.
It is very important to get all parts of the cake covered to make it waterproof.
Spread the cream all the way to the bottom of the cake and seal the gap between the cake and the tray. If there are any gaps in the white chocolate cover, liquid jelly might leak into the cake and make it soggy. As the jelly gets absorbed into the cake, small air bubbles might push cake crumbs and buttercream into the jelly making it look messy and murky.
Spread the white chocolate cream a bit higher than your water level will be. You will cover the excess later.

At this point, you can create the fish, sand, rocks, sea shells and other shapes you wish to place in the jelly. The easiest method for creating shapes is to use a factory made mold. Many molds are available and easily found on the internet.
To learn how to make sand and rocks for the sea bottom, you can visit this page.
If you want to create a custom shape, you can create it using non-toxic clay. When the shape is finished and dried, use it to make a mold with food-safe silicon and corn starch.


You can find more information about making silicone molds on this page.

![]()
When your mold is dry enough to use, fill it with gelatin cream base and leave it in the fridge to set.
Gelatin cream recipe:
Sprinkle 1 Tbsp. High quality gelatin over 3 Tbsp. cold water. Stir and let it soak for a few minutes.
Add 1/2 cup hot milk and stir until gelatin has dissolved. Add 1/2 cup sugar, 1 Tsp. vanilla and 1/2 cup cold 35% cream. Add white food coloring if desired.


When the cream has set, remove the shape from the mold and add desired details to it. You can use food coloring to paint the cream shape but dark colors spread quickly in jelly and you might have a dark hue around the stingray by the time the cake is finished.
Another way to make a dark surface is to mix clear jelly and black cocoa. Use this mixture to cover the top of the stingray and let it dry.


Prepare some clear jelly using any flavor you like.
Clear jelly recipe:
Sprinkle 3 Tbsp. High quality gelatin over 1 cup cold water. Stir and let it soak for a few minutes.
Add 3 cups of hot (not boiling hot) water and stir unit gelatin has dissolved. Add 2 Cups of sugar, 1 Tsp. citric acid powder and 1 Tsp. of food flavoring.
(You may need to make several batches of the recipe depending on the size of your cake).
Remove the foam from the top using a thick sieve and add a few drops of blue food color.


Pour the blue jelly into several containers.


When the first layer of the blue jelly has set, place a stingray onto it and add more liquid jelly. You can make several layers and place stingrays at different angles above one another.


Use the same cream base you used to create stingrays to make algae.
If the cream mixture has solidified, place it in a small container with warm water to make it liquid again. Mix a few drops of green food color into the cream and inject it into the jelly. Use a blunt-tip needle and a syringe to create random algae shapes.

When all your individual pieces are ready, place a cake ring around your cake and secure it with tape.


Add a sheet of acetate into the ring. Make sure the acetate is straight and forms an even circle at the top. Secure it with tape and seal the bottom with a thin line of blue jelly. Let the first seal set completely and create a second one over it.


You may have to prepare more gelatin or reheat the unused portion multiple times while you work on the cake. To learn more about working with gelatin, you can watch our online tutorial here.
Position all desired pieces (sand, rocks, shells, algae, fish) on the sea floor and sides. Be careful not to scrape any cookie crumbs off.
Keep jelly pieces away from the acetate film as much as possible. If jelly leans against the acetate, the final jelly surface might be uneven where the contact occurred.

Pour room temperature jelly into the cake gap. Do not use warm gelatin at this stage. Warm gelatin will melt the white chocolate seal which could result in a soaked cake and murky jelly.
If you have small pieces that could float (sand, shells, etc.), pour the jelly in layers and wait for one layer to set before adding another one. Inspect each layer and remove any debris and air bubbles before the layer sets.

When the jelly has set, use a cutting tool to carve little wave-like holes on the jelly surface.
Place a melting tool into hot water and melt the rough wave edges off.
Inspect the island edges, if the jelly has detached from the island, pour more liquid jelly into the gap and leave the cake in the fridge to set completely.


Warm up the leftover melted dark chocolate and black cocoa mixture and cover all white chocolate parts visible above the jelly.

You are ready to remove the cake ring from the cake now.
Before you attempt to remove the acetate film, run a toothpick along the edge of the jelly to detach the top first.
Depending on your acetate, it may come off easily or you may need to warm it up with a hairdryer. Be careful not to direct the hot airflow onto the cake top and blow loose cake crumbs onto the jelly.


If there are any imperfections on the side of the jelly, you can use a melting tool to smooth them out. Use warm water to heat the melting tool, you do not want the tool to be too hot and create additional dents in the jelly.

To create the second waterfall, cut and remove the jelly from the side of the mountain.


If the jelly edge is too thick and sticking out, flatten it with a hot melting tool.
Cover the exposed white chocolate with melted dark chocolate and black cocoa mixture.


At this stage you can use white food coloring to draw waterfalls and sea foam around the islands or create a more realistic foam using the recipe below.
Gelatin Foam Recipe:
Sprinkle 1 Tbsp. gelatin over 3 Tbsp. of cold water. Stir with a fork and let the mixture soak for a few minutes.
Add 1/4 cup hot water and stir until the gelatin mixture has dissolved. Add 2 Tbsp. icing sugar and 1/8 Tsp. flavoring. (You can use the same flavor you used to flavor the "ocean").
Blend with a stick blender until there is a thick layer of foam on the top of the mixture. Place the foam container into warm water to prevent it from solidifying.
If you run out of foam at any time, you can blend the mixture again to create more.


This mixture has a high ratio of gelatin. This will ensure the foam is stable, but will also cause the foam to solidify quickly. Use only a small amount at a time and apply it quickly using a small brush or a barbecue stick.


Place the foam vertically at the waterfall sites and alongside the coast line around the islands.


Add more bumps and greenery around the second waterfall and your tropical paradise is done.

This video shows the process of creating this cake:
Stingray Jelly Desserts
If you are not up to the challenge to create a large cake right away, you can practice by making small stingray desserts.
Instead of coloring white stingrays, you can pour the black cocoa base into the mold first. When this first layer solidifies, you can pour the white base over it. Warm up the white base to ensure it sticks to the dark layer properly.


Pour a thin layer of liquid jelly into the carved lines and place the sand on top.
Leave the dessert in the fridge to set.


To take the dessert out of the container, keep it in warm water until the edges have detached from the container. Turn the dessert upside down onto a plate.
If your container has rounded edges, it may distort the look of the stingray inside. Cut the edges off to create straight lines at the top of the dessert.


Remember to take a picture of your delicious, jaw-dropping dessert before it's gone!

To learn more about Gelatin Art, visit our instructions page here.
To purchase high quality gelatin or our easy-to-use starter kit for beginners, visit our online store.
